As the season changes, and leaves begin to fall, it’s the perfect time to introduce your young ones to the wonders of nature through art. Leaf rubbings offer children a unique way to explore the details and textures of different leaves, all while creating their masterpiece. Below is a step-by-step guide to help you set up this fun and educational activity for your child.
Materials Needed:
- A collection of leaves (Try to gather a variety: big, small, and with different patterns!)
- White or light-colored paper (plain printer paper works well)
- Crayons (with wrappers removed)
- A flat and clean workspace
Instructions:
- Collecting the Leaves: Start by taking a nature walk with your child. It can be in your backyard, a nearby park, or even down the street. This is not just an opportunity to collect leaves but also to observe the changes of the season, discuss different types of trees, and enjoy some quality outdoor time.
- Prepare the Workspace: Once you’re back indoors, lay out all the leaves on your flat workspace. Flatten them out gently with your hands. If the leaves are very curled or brittle, you can place them between the pages of a heavy book for a short time to flatten them out.
- Choosing the Right Leaf: Let your child pick a leaf they want to start with. Encourage them to feel the leaf and talk about its texture, size, and any unique qualities it might have.
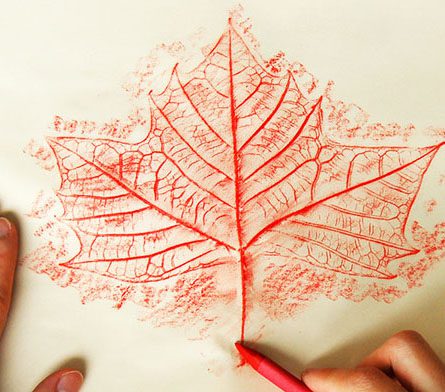
- Positioning for Rubbing: Place the chosen leaf under the paper. Ensure the veiny side of the leaf (which usually has more texture) is facing up, as it’ll provide a clearer rubbing.
- Color Selection: Let your child pick a crayon color. Bright or dark colors tend to work best to highlight the intricate details of the leaf.
- Start Rubbing!: Show your child how to hold the crayon sideways (not using the tip) and gently rub it over the area where the leaf is. As they rub, the outline and inner details of the leaf will start to appear on the paper. Remind them to rub gently; pressing too hard can tear the paper or crush the leaf.
- Explore and Experiment: After the first leaf, encourage your child to try other leaves, use different colors, or even overlap rubbings to create multi-layered effects.
- Discussion Time: Once your child has finished, take a moment to discuss their artwork. Which leaves had the most interesting patterns? Which colors did they like the best? What did they learn about the shapes and textures of different leaves?
- Display Their Art: Proudly display their leaf rubbings around your home. It serves as a reminder of the beauty of nature and the fun activity you shared.
Conclusion:
Leaf rubbings are a timeless activity that can be enjoyed by children of all ages. They’re a fantastic way to bring nature indoors and foster a deeper appreciation for the natural world. Enjoy this craft as an annual autumn tradition, watching your child’s techniques evolve and grow over the years!
Recent Comments